New on RocknQuilts!
Toot-torial Tuesdays!!
Please link up your tutorial below and place my button in your blog post.
Thanks for taking part in the very first Toot-torial Tuesday blog hop!
@
****************************************
Toot-torial Tuesday #1
14 Jun 11
***************************************
Let's make a fun, quilted bag!
Here is a pic of the finished product:
Let's get started!
You will need one 11"x22" piece of batting, one fat quarter (18"x22" piece of 100% cotton fabric) and one zipper between 9" and 12" in length.
Using a 24" see-through ruler, mark diagonal lines across one side of the fabric. I like to use Olfa rulers.
Move the see-through ruler down 2" and mark again.
Once you've completed diagonal lines completely across in one direction, turn the fabric sandwich around and mark diagonal lines completely across in the other direction, forming diamonds.
You know they're a girls' best friend!!

This is the J foot. It is marked with the letter "J" and has a little black knob on the top left. You will find it in your machine's pouch.
I just love using this slim chalk liner from Clover! It marks easily and is easy to refill.
We will be using the Brother Project Runway Edition HS-2000 in class today!
Place your fabric sandwich on your machine, put the presser foot down, go forward a few stitches, then reverse a few stitches to 'lock in place' before continuing forward down the entire length. It's best to start on the center diagonal line and continue going in that direction until all those chalk lines that were marked 2" apart have been sewn.
After sewing each marked line in both directions, it's time to cut off any excess batting. This can also be done before beginning to sew.
The fabric should be the same length as your zipper. If not, you may need to cut your fabric down.
This is the zipper foot "I". Please set it to the right and select stitch 01.
To sew on a zipper, it needs to be zipped down.
The foot will sit directly upon the zipper teeth. Sew as close as you can to the right of the teeth, being careful not to sew over them. If you do, don't worry! There are stitch rippers to help take out the stitches and then we can start again :-)
Sew from the top down.
Stop at the bottom.
Switch the zipper foot to the left. You can get assistance with this if you'd like :-)
Bring the other side of the fabric down to meet the side of the zipper that hasn't been sewn down yet. In this picture, the top (right side of the zipper) has been sewn on and the bottom (left side of the zippered) has not yet been sewn on.
Keep the zipper unzipped :-)
After the zipper has been sewn on, zip it up halfways, leaving an opening sew you can turn the bag when the two open sides have been sewn together.
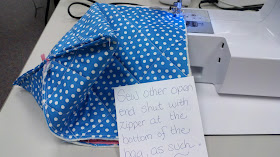
To make the bag triangular, sew one side (as shown on the upper left) with the zipper in the center. The other end should be sewn shut with the zipper at the bottom.
Here we are inside-out; pull the bag right-side-out through the open zipper and....
Ta-dah! How fun it will be to fill your new bag with all kinds of great stuff!!
Ideas:
*How about a masculine fabric for a Father's Day bag and fill with shaving cream, razors, and comb?
*How about feminine fabric for Mother's Day and fill with her favorite lipstick, hairbrush and nail file?
*How about dinosaur fabric for a little brother and fill with race cars, dinosaurs and his favorite toys?
*How about a fun fabric for your sister and fill with her favorite mascara, lip balm and sunscreen?
The ideas are endless and you can make it yourself!!


What a great little bag and a wonderful tutorial!
ReplyDeleteAnd I LOVE your the new look of your blog!
you have great tutorials Mary Ann ...thank you for your comment....looking after one of my grandsons for a few days; so no sewing right now.
ReplyDeleteWe will be outside most of the time....he likes to dig and help transplant things...lol
Nice tutorial. Cute bag.
ReplyDelete