
I know what you must be thinking..."It's still Friday night!" Here's my story (and I'm sticking to it!): tomorrow our eldest son and his new girlfriend come to visit and for dinner, plus it's my Dad's 78th birthday and my daughter's 17th birthday, so I've got dust bunnies who need collecting...'nuf said!
Anyhoo...I was able to spend six hours sewing this afternoon and evening! I'm really happy with my progress and I hope you'll leave me a comment about what you think...I just LOVE comments!! I also appreciate the time you take to read and reply, as you are all busy quilters, too! I can't wait until I can sit down and read the Friday Night Sew-In results on your blog, so leave me a note so I can check it all out! Thanks!
OK, down to business:
Friday Night Sew-In, Project 1: bordered pillow case

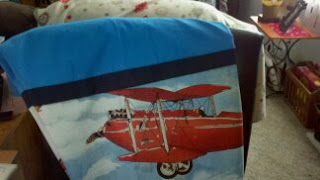
Isn't this the most adorable fabric you've ever laid eyes on? It might be if your Dad had been a pilot like my Dad :-) It's my Dad's 78th year young on Sunday, so when I laid eyes on this fabric, I knew that I had to make him a King-sized pillow case (with pillow, of course!)
The directions are free online at Million Pillow Cases or here"


After cutting three pieces of fabric,
main fabric print for a King is 35x43"
coordinating print 17x43"
and contrasting print 4x43" strip;
fold the strip lengthwise in half and press as shown above

then lay the main fabric down right side up, the folded strip along its top edge (open edges on the raw edge of the main fabric) and then the coordinating print on top of that and sew 1/2" seam


Lay the pillow case open, facing right side up, then

fold it in half and smooth it out, matching up all the ends

To make the coordinating print seam, fold in 1/4" and then fold in another 1/4" again, and sew

Sew all the way around the pillow case opening

clip two bottom edges, then turn right side out

Isn't this a sharp-looking airplane?! Dad's gonna love it

Finally, put the pillow case on a nice, fluffy King-sized pillow

and of course, let someone try it out to make sure it's "just right"...
I believe little Gunnar has decided it is...he's asleep underneath it right now, as a matter of fact! LOL Good thing my Dad loves our dog!
Project #2 of the night: finishing the blocks on Harriet Hargrave's "Woodland Winter" quilt from the "Quilter's Academy Freshman Year"

Harriet suggests starching two or three times on each piece, so here I am starching...

Harriet recommends pressing with the edge of your iron

Wow! This looks good :-) (I know - I need an iron without so many holes - ideally, there should be steam holes only near the top - have yet to find it - what kind do you use?) Since I was using a dry iron with liquid spray starch, all was well...

Here is Harriet's Block layout

Now, I have a nice, big country kitchen table and this 33x33" top just barely fits! This is going to be larger than I had imagined; a nice surprise :-)

Having quilted for only the past eight months, I'm way behind in learning about chain piecing...this is what I wanted to understand before completing any more of the Civil War Chronicles BOMs, so this was thrilling to learn! Thank you, Harriet! One thing I added (since I'm out of time to actually do the chain piecing tonight), I pinned each row together using a small piece of paper numbered with each row, #'s 1-11

Carefully keeping Row 1 on the bottom...

and stacking Row 2 on top...

here goes Row #2!

and there you have it!

To chain piece (sorry if you already knew, but this could be new to other fellow beginners out there in blogland), pick up the first block on the left of the quilt and place it on top of the second block in the same row (detailed instructions in the "Quilter's Academy Freshman Year" there to the left)

placing Block 1 over Block 2, then place those two blocks on top of Block 3 and keep going the same way all across to the end of the row, then pin at the TOP of the blocks to make sure you don't accidentally get them turned around the wrong direction!

My rows are disappearing...

and here they all are: Rows 1-11
I placed them in their plastic baggie for tonight, but am ready to take off with the instructions on page 29 when the time presents itself! This was a great lesson - thanks to my teachers Carrie and Harriet Hargrave!
PS Hey, gals: When are you going to put your lessons in DVD format?
That would be a fabulous project after the series has been completed!
Fellow bloggers: please post a note of encouragement here for Harriet and Carrie about a DVD series if you also think that'd be something you would be interested in....
Wow... you got a LOT done tonight! Love the vintage airplane fabric and I know your dad will too... and the quilt top is coming together very nicely!
ReplyDeleteHave fun today and happy birthday to your dad and daughter!
Boy, you were very productive last night! I love the pillow case, I am sure your dad will too. Everything looks great!
ReplyDeleteYou're doing great! If you ever need a quick way to label blocks without sticking yourself - staple the tag on. To remove the staple, just bend it in half and ease the prongs out of the fabric. In days gone by, price tags were on with "pronged" tags, staples are no different!
ReplyDeleteThank you everyone! Your encouraging comments and suggestions keep me inspired to sew and sew some more :-)
ReplyDeleteThis is such a great pillowcase..thank you for the tut...looks like your pooch there loves it too .lol
ReplyDeleteGreat projects to keep you busy with a FNSI. I like the pane fabric. Of course, the pets always find their way to the comfy pillows and quilts.
ReplyDeleteYou have been busy! great work, hope your Saturday was all you wanted it to be!
ReplyDeleteWow, love the airplane pillow case!
ReplyDeleteA very productive Friday night!
ReplyDeleteI'll bet the airplane pillow cases were a bit hit! They're great.
ReplyDeleteAnd you went on to do a LOT of work on the quilt blocks. What a productive FNSI!
Wow - thanks for all the comments! I appreciate them all very much :-) Happy quilting, Mary Ann at rocknquilts
ReplyDelete